|
Home > Other interesting Stuff |
How to change the battery in a Holden Commodore car key |
So I guess the first question is why does the seemingly simple task of changing a battery in the remote control for my car warrant the creation of a dedicated web page. Two reasons, first Holden decided to make the job into an arduous task that took me a while to figure out and second, because Holden charge $140 for a replacement key when the battery goes flat.
This really bugs me in a huge way. Why should I effectively pay $140 for a battery that you can buy in the shop for a few bucks? I don’t really care if the battery did last the best part of ten years and that the key is on its last legs. It still works so I thought I’d have a go at replacing it myself.
Before I get into the steps to change the battery, I’ll first go through a few points about the key itself.
The first point I want to make is that the battery is not rechargeable. It just lasts for so long because it is a long life lithium battery and the remote uses very little power when you push the buttons.
Continuing the battery myth theme, the battery is actually spot welded to the terminals, not soldered so you will not be able to separate it from the terminals with heat. Why does this matter? Well, batteries and prolonged heating are not a good combination. Attempting to use a soldering iron to remove the terminals could lead to the battery exploding.
Next, the two screws in the bottom of the key do not actually hold the case together. They merely hold the metal key stalk in place. One of them does double as an electrical connector that bridges the gap between the stalk and the circuit board but that’s it.
Why is this important? Because after you change the battery, you will need to find a way to secure the two halves of the shell together again, there’ll be more on this later.
Finally, removing the battery from the key wipes the code from its memory that allows it to work with your car. This means that the remote will not work after you have finished changing the battery until you put the key into the ignition and start the car with it.
Why is this important? If you change the battery with the car deadlocked (push the lock button twice) and don’t have a spare key, you simply won’t be able to open the car again and you’ll be stuck. If you just have it locked, you will be able to open the door using the key but the alarm (horn) will go off when you open the door and will only stop when you start the car with the key.
|
Equipment and Skills required |
A cross headed screwdriver.
A flat bladed screwdriver.
A sharp knife.
A soldering iron and solder along with basic soldering skills.
A High Speed rotary tool with diamond grinding bit (I use a Dremmel).
Sticky tape or glue. |
Directions |
 |
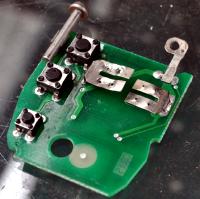
Use a screwdriver to remove the screws holding the key stalk in and gently pull it out. Set the stalk and screws aside somewhere safe.
Now take the flat bladed screwdriver and use it to prise apart the key shell. Be as gentle as you can to avoid too much damage but remember that the thing was never designed to be open so you will need to use a bit of force.
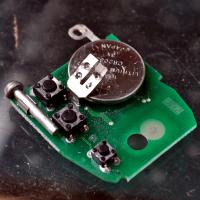
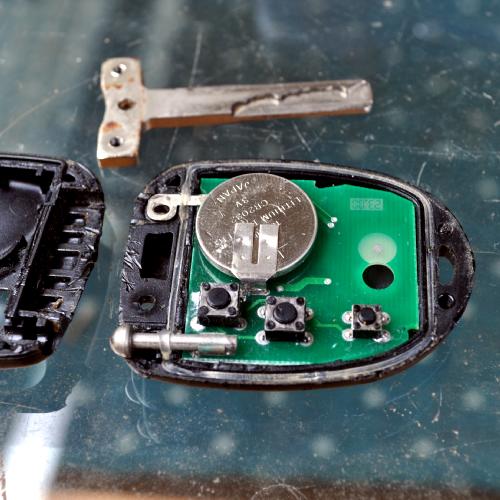
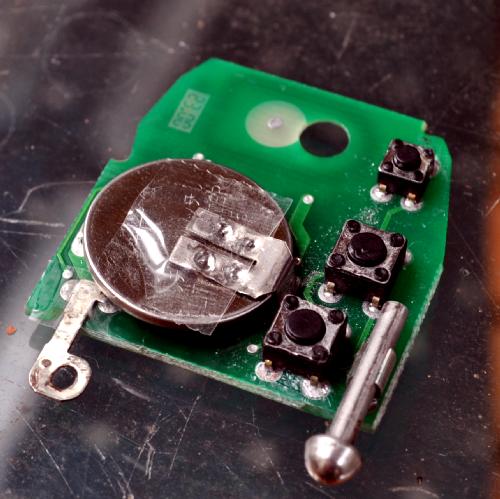
Once the case has been opened, you will find that the circuit board is loose but still attached to the bottom case by a rubber seal. You should be able to simply stretch the rubber to remove it from the circuit board without damaging it. You will also be able to see the battery and how it has been spot welded to the terminal. |
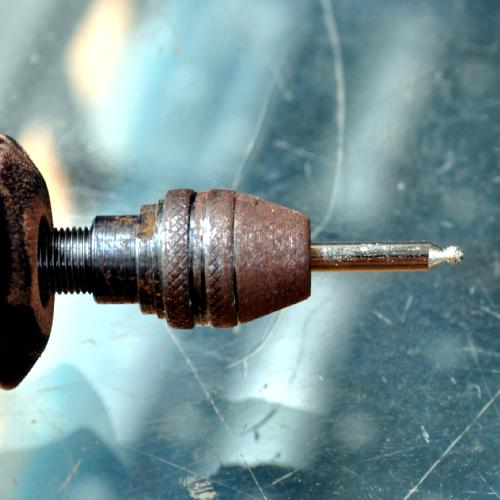
Next, we need to get out the high speed rotary tool with a diamond ball grinding bit. Running the machine at high speed, start to grind down on top of the spot welds directly.
Your aim here is not to grind all the way through, rather to weaken the metal in the terminal surrounding the weld until it is thin enough to allow you to snap it when you prize up the terminal.
Once you have ground out all four welds on top of the battery, take a sharp knife blade and use it to, as gently as you can prize up the terminal arms. You are going to bend the arms in the process regardless of what you do but try to minimize it as much as possible. |
 |
 |
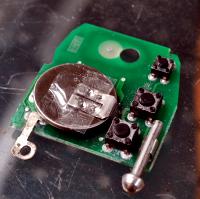
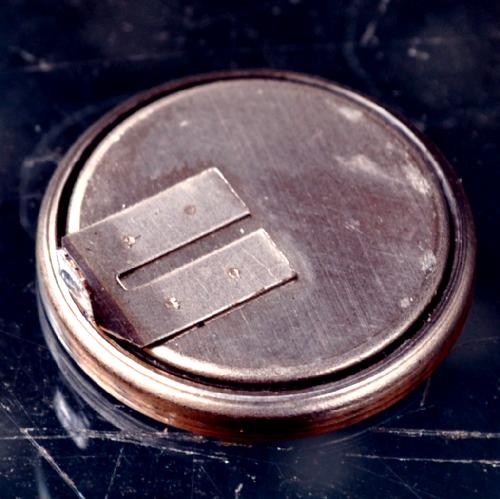
Unfortunately, the bottom terminal is also welded on too. This means that in order to remove it you need to use a soldering iron to melt the solder connection to the circuit board and pull out the battery, terminal and all so you can continue the process.
Once the battery has been released from the circuit board, repeat the process to remove the second terminal before soldering it back onto the circuit board.
The battery with the bottom terminal attached can be seen here
|
Now all that remains to do is to secure the new battery in place and re assemble the key. There is nothing in the key itself to hold the battery in place so you will need to use some sticky tape here. I put a small piece of tape over the top terminal itself before adding a second layer that extends around the sides of the board to hold the battery firmly down against the bottom terminal.
This bit is extremely important. Remember that if the connection is lost, even for an instant the key will lose its coding and the remote won’t work to unlock your car. In other words, make sure that you tape down the battery in such a way to make sure it’s just not going to move. |
 |
 |
To reassemble the key, refit the seal rubber around the two key contacts, reposition the circuit board into the plastic body and replace the other half of the plastic shell. As I mentioned earlier, once separated the two halves of the plastic shell will not just clip back together so you will need to use either tape or glue to finish the seal.
Once this is done you can then replace the key stalk and screw it in. To test the key remote, you need to first go and start you r car with it. After doing this, providing you’ve been successful the remote should work like new. |
So, it’s not a simple process but the 20 minutes I spend doing it has meant that I don’t need to spend the $140 to replace the key. Despite Holden saying it shouldn’t or can’t be done, if you have the skills, equipment and a key with a dead battery, I really don’t see that there is anything to lose by giving it a go. It certainly worked for me. |


Current Comments
32 comments so far (post your own)well done
Posted by sven on Tuesday, 27.03.12 @ 15:18pm
man you are a master ^^
thanks a lot for this valuble info
many thanks from Saudi Arabia
keep going :)
Posted by Mohammad on Friday, 15.03.13 @ 18:19pm
In the process of doing this, as you have said, stabbed my thumb with screwdriver, hahahaha, swore some, as you do, but yes, with some force, this does work. So yes saves you some $$$$$. Thanks.
Posted by Gordy on Sunday, 24.03.13 @ 14:57pm
Thanks, Helped heaps!!
Posted by Micromedia on Monday, 1.07.13 @ 23:47pm
Thanks MJH,
This is excellent!
The dealer I contacted July 2013 wanted $190 and me to get my car towed to him.
Excellent photos excellent text. Regards Malcolm
Posted by Malcolm Ricketts on Friday, 12.07.13 @ 11:39am
Dear Holden.
All you have done, by making these remotes "unrepairable" is force people to lateral action.
Typical pen pusher mentality.
Wake up. You're losing customers who can't just buy a new one. Duhh!
Disgruntled Holden fan. Bring back the old Holden simplicity...
Posted by Rod Aylett on Saturday, 17.08.13 @ 13:56pm
Thank you very much for this excellent tutorial. Could you please inform how can I know the exact type of battery I have to buy?
Posted by Julio on Saturday, 31.08.13 @ 19:15pm
Great thanks.
If you are comfortable with soldering, just unsolder both the battery tabs from the circuit board to remove the battery. You can buy a battery from JAYCAR with the PCB tabs already attached and just solder it back onto the board. Worked for me and much easier than all the grinding.
Posted by Bob on Wednesday, 11.09.13 @ 14:12pm
Well taping down the terminals to the battery without any kind of secure electrical connection is a recipe for disaster. I would take it to someone who has a spot welder specifically made for battery contacts and is prepared to do the job for a small fee.. or as Bob said buy the one from Jaycar, solder it to the circuit board - then there is no problem with losing your code :)
http://www.jaycar.com.au/productView.asp?ID=SB1762&w=cr2032&form=KEYWORD
The battery is CR2032. You can also get a new shell off eBay for about $8 if you want to avoid having to break and then glue back together.
Posted by John on Wednesday, 20.11.13 @ 14:06pm
It verks!
Posted by Yuri on Friday, 6.12.13 @ 23:48pm
i snapped a screw off getting it out cant get it out now i need a new key cut
Posted by holden on Tuesday, 31.12.13 @ 14:41pm
bob do you have the part number from jaycar?
i look ed at the catalogue and there seems to be nothing close to the pictures above?
Posted by mathew thomas on Tuesday, 14.01.14 @ 12:16pm
Thanks Mate! It really works! Little bit hard to break the spots welded however i made it! Thanks
Posted by Diego on Saturday, 18.01.14 @ 23:03pm
It easier to de-solder the battery from the PCB,
Battery world sells the battery with lugs for $8.00
Posted by George on Wednesday, 30.04.14 @ 14:41pm
thanks!
my experience was as follows (2005 vz)...
ordered new shells from ebay (approx $10 for pair) ordered CR2032 with solder tabs from element14. I cut the top tab on the old batteries to remove from the board using side cutters and bend until fatigue on the base tab. I used some solder wick to remove solder and the remaining pieces of tab. Soldered in new battery (make note of polarity!) and keep heating to a minimum to prevent battery from overheating.
reassembled and working like new!
Posted by clobs on Sunday, 18.05.14 @ 17:19pm
This works like a charm, so thank-you. I did a variation of the suggestion above from Bob
The way I did this was to use the Jaycar battery (part number SB1762) which cost me $2.50
I removed the solder from the (-) side of the existing battery from under the circuit board, but cut off the large flat metal section that joins the (+) side over the top as close as possible to the spot welds so that the metal section can be folded back on top of the replacement battery. I used a wire cutter (aka diagonal pliers or snips) to do this. No grinding required.
Once the old battery was out, I bent the (-) side connecter of the new battery so that it fitted in to be soldered from underneath the circuit board. I needed to bend this as close to the spot weld as possible so that the new battery fitted in the same spot as the old one. Otherwise you wont be able to fit the circuit board back into the plastic key shell properly.
Once the (-) side was soldered from underneath the circuit board I folded the existing (now cut) end of the (+) lead down onto the top of the battery and using solder, joined this to the PCB tab of the new battery - you cannot solder onto the battery directly.
I had to snip off the (unused) PCB tab leads from the (+) side of the battery as they got in the way of closing up the key shell.
Posted by Terry on Thursday, 22.05.14 @ 14:25pm
You Da Man Bud that,s Gold thanks big help.
Posted by Rob on Saturday, 19.07.14 @ 10:38am
my key would not start my vy at all turn the car over but not start i tock the battery out still no good got sick of it 2 hours later tryed the key with no batery and the car started what the put a battery in works fine no explanation as to why the car would not start in the first place the kyey has not started the car 4 over 12 months take the battery out for2 hours and works well money in my pocket
Posted by luke on Friday, 26.09.14 @ 16:09pm
Excellent piece of work with great instructions and pictures.
Also thanks to the follow on comments with replacement battery and case details.
Cheers,
Greg.
Posted by Greg on Wednesday, 1.10.14 @ 12:37pm
$3.20 battery from Farnells, 10mins to change battery, $150 saved (VY Commodore)
Awesome
thanks
Greg
Posted by Greg on Tuesday, 14.10.14 @ 12:47pm
cheers mate! great informative post!
Posted by david on Saturday, 25.10.14 @ 13:02pm
I only have one dead key, do need to reprogram somehow after I replace the battery?
Thanks
Posted by Jacob on Friday, 14.11.14 @ 15:51pm
Mate, thanks a lot i did the following and it worked a treat and saved me 190 dollars and a 2 day wait because of public holidays Your a champ
Posted by Goma on Saturday, 27.12.14 @ 12:05pm
I managed to break out the battery using a Stanley knife
to pry the battery terminals off the battery.
Not to aggressively or you will break the blade.
This worked for both terminals
Put it back together with new battery,it then would not
work & I thought I had stuffed it ! Until I read the above.
Now all is good thanks for the info
Regards Brian
Posted by Brian on Monday, 2.02.15 @ 20:55pm
Thanks for posting, mine just died today so I will get a battery from jaycar & try this fix.
In the meantime I will just put the key in the door & turn it like we used to in the olden days! Yes it works!
The lock may be very tight as It has not been used much (or at all), spray some WD40 in the slot & wait for it to penetrate and use the key manually to unlock/lock your car.
Cheers
Mal
Posted by Mal on Wednesday, 4.03.15 @ 09:35am
I purchased a new battery and replaced the old one and it starts the car but wont lock or unlock the doors. Any ideas? Thankyou
Posted by craig on Thursday, 9.04.15 @ 15:01pm
Thanks!
direct appreciation of Brazil, here called the commodore Omega
Posted by Wilson Russo on Thursday, 16.07.15 @ 05:16am
Brilliant, used the Jaycar battery and cut the terminals off in-situ. No grinding needed and battery terminals soldered straight onto remaining old terminal. Best $2.50 spent in a long time
Posted by lance on Sunday, 19.07.15 @ 14:25pm
Changing the battery will not lose the memory, buy the CR-2032/HFN battery on Ebay from Capital Stores or Element14
carefully melt the solder on the lugs and remove the old battery, insert the new battery and make sure thejoint is well soldered and not dry, assemble the case and your finished
Posted by Doc on Saturday, 22.08.15 @ 14:53pm
Works a treat. Desoldered the battery from the PCB and soldered in a new one that I got from Jaycar with the terminal lugs on it. I did have to solder a wire from the +terminal to the original point ont he PCB but there is a handy hole in the PCB that gives you access. Cheers!
Posted by Devar on Thursday, 10.09.15 @ 23:53pm
It worked a treat, I used a dremel to grind off both top and bottom welds!
Posted by Graeme on Wednesday, 23.09.15 @ 20:24pm
After failing to stick the two halves back together to last for a reasonable length of time I ended up bolting them instead.
The circuit board has a convenient whole in the middle so after finding 3 suitable bolts and matching nuts I drilled a small guide hole in the case straight through the middle of the circuit board hole. Then I heated the nuts of a flame and with nose-point pliers pushed them into the bottom case from the outside until they were flush with the surface.
A bit of sanding/tidying and now I can pull apart the fob whenever I want.
and the thing looks very industrial retro too.
Posted by crazyglue on Sunday, 26.11.17 @ 17:43pm